Thank you for your purchase from Smilox.com, your first step towards whiter and brighter teeth.
Teeth Bleaching is a safe and effective way to whiten healthy and non-decayed teeth. Smilox.com recommends that you have a complete dental exam before bleaching your teeth if you have decayed or fractured teeth or have periodontal (gum) disease.
Please use the easy to follow instructions to a great impression.
Enclosed, you will find 2 impression trays (1-upper and 1-lower) and 2 sets of impression materials used to make an exact mold of your teeth.
From the molds, your custom bleaching trays will be fabricated. Your custom trays increase the comfort level compared to the over-the-counter trays while greatly improving the ability of the bleaching solutions.
Remove the impression trays and material from the packet. Your hands must be clean and dry prior to starting the impression process.
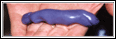
Open one packet of impression material and mix the 2 colored impression material together. Knead and roll the 2 colors until they are blended into one uniform color.
Roll the impression material into a hot dog shape and place into impression tray. This process should not take more than 30 seconds. After this period, the impression material will begin to harden.
· clean hands · get materials
· mix colors · knead and roll · only 15-30 seconds
· roll into "hot dog"
· place in tray
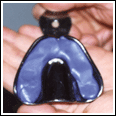
Place tray over your upper teeth making sure that your teeth are centered along the middle of the impression material. Press firmly and evenly until the tray forms around your teeth and the impression material extrudes through the holes in the tray.
Although recommended, it is not necessary to get all of your teeth in the impression. However, it is critical that your front 8 teeth, as well as the gums above the teeth are clearly seen.
After the impression tray has been in place for 4 1/2 minutes, remove the tray, rinse under cold water, and inspect. It is important that you do not remove the impression tray too soon, before the impression material has completely hardened.
You should be able to clearly see the impression of your teeth and the underlying gums. If necessary, the trays can be re-used by removing the old impression material that has hardened.
Repeat steps 2-4 for your lower teeth using the lower tray (U-shaped).
Once both impressions have been taken, place them in the pre-addressed, postage-paid envelope and return to Smilox.com
Once we recieve your impressions, your custom bleaching trays will be fabricated, and returned to you, along with your bleaching kit in approximately 2 weeks.